***********
While at BlogHer, I attended a Food Styling and Photography workshop offered by Hillshire Farms. This post is not sponsored by them nor am I being compensated for this post by anyone else. I am writing this post simply because hands down, this was one of my absolute favorite sessions this year at BlogHer. It was interesting, engaging and believe it or not, involved a lot of laughing. Who knew that food photography could be so entertaining and fascinating??
The speakers for the session were Sara Remington (a food photographer), William Smith (a food stylist) and Helen Rosner (a web editor for Saveur.com).
The key points that resonated with me from the Food Styling portion were the following:
Don’t overcrowd the plate
• Keep it simple, only plating what is needed
• Use a serving size that is just right – not too much, not too little
• Use a bigger plate to make the plate not too crowded
Garnish the food
• Don’t overdo the garnishing
• You can also use powders to garnish, like powdered coffee, spices, or colored salt
• Garnishing almost always adds dimension to your food presentation, when kept to a minimum
Positioning
• There is talk of a virtual clock where meat (and sandwiches) is at 2 o’clock, starch at 10 and veggies at 6
Plates
• White or off-white plates make the food stand out more
Focus
• The main part of the dish, usually the meat (or sandwich) should be put most in focus (for example, a little elevated)
The following tips helped me with the Food Photography portion:
Lighting
• Treat the food you’re photographing as you would any other still life subject and ensure that it is well lit
• One of the best places to photograph food is by a window where there is plenty of natural light – perhaps
supported with flash bounced off a ceiling or wall to give more balanced lighting that cuts out the shadows.
This daylight helps to keep the food looking much more natural
Props & background
• Pay attention not only to the arrangement of the food itself but to the context that you put it in including the
plate or bowl and any table settings around it
• Don’t clutter the photo with a full table setting but consider one or two extra elements such as a glass, fork, flower or napkin. These elements can often be placed in secondary positions in the foreground or background of your shot
• Pay attention to backgrounds and clear out any elements you don’t want in the final shot
Be quick
• Food doesn’t keep its appetizing looks for long so as a photographer you’ll need to be well prepared and able to shoot quickly after it’s been cooked before it melts, collapses, wilts and/or changes color
• One strategy that some use is to have the shot completely set up with props before the food is ready and then to substitute a stand-in plate to get your exposure right. Then when the food is ready you just switch the stand-in plate with the real thing and you’re ready to start shooting
Source: A handout from the Hillshire Farms workshop.
Helen, the web editor from Saveur.com was also very helpful (there was no handout provided for this section, so I'm done with fancy, concise lists now) What I took away from Helen's presentation is this:
1) keep posts clean and to the point
2) don't include a zillion, superfluous pictures.
She actually used the Pioneer Woman as an example of how to NOT do recipe posts. In the post presented, PW had included such snaps as ladling sauces. As Helen pointed out, we all probably know how to ladle a sauce at this point. The shot was artistically pretty, but not particularly useful. Helen used a particular PW post that had over 20 pictures. No, this was not a slam on PW - she has a Following that doesn't mind if she uses 1 picture or 20. The rest of us, however, are NOT The Pioneer Women and we do not have Followings.
Oh, and at this point, I am going to completely violate the "concise" rule for posting because I am already getting too "wordy".
And I am not nearly done here, folks.
One key piece to the entire presentation?? Not once was the suggestion offered to use "non-food" ingredients (need to thicken a sauce? Use cornstarch.) Leave the wood glue and varnish in the garage, I guess.
So, after all of that? It was time for me to start playing around. I whipped up some pad prik kai (the recipe is at the end of the post) and got to work photographing. Time was of the essence because the sunlight wasn't going to last - neither was the food, for that matter.
I realized quickly that my yellowish Franciscan Appleware photographs horribly, so I pulled out a plate that was my great-grandma Courtney's (who coincidentally hails from the Land of Pioneer Woman. Bartlesville, Represent! Woot! Dewey!). Anyway! Her china is simple, white and slightly elegant without being distracting. My dining room faces the west and gets awesome natural light. I cleared out a space and started shooting.
All of these photos are SOOC (straight out of camera).
This was my favorite photo:
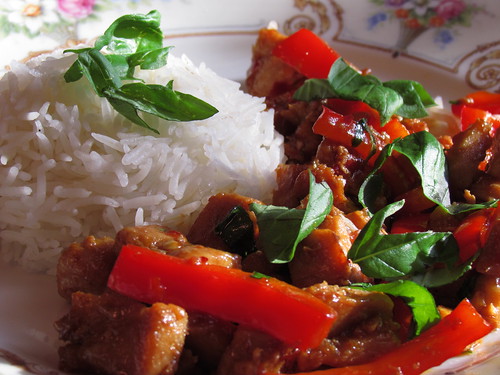
However, it was a little too dark. I probably could play around with it in editing, though.
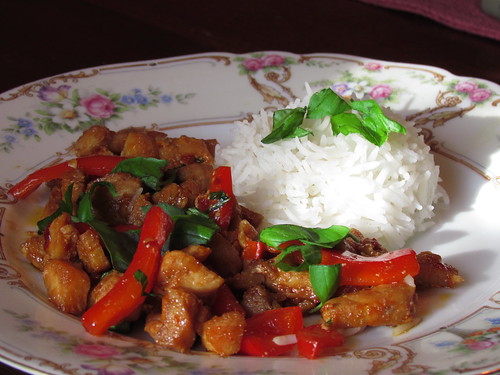
I liked the presentation on this one, but the lighting still wasn't quite "there". The food is a little too dark, the rice looks washed out:
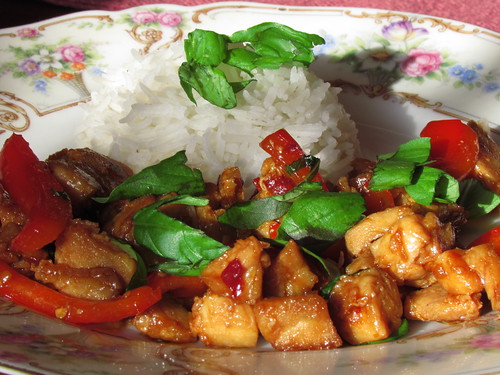
Although not my favorite photo, this photo probably represents the dish the best - all of the important elements are presented. The rice, the basil, the peppers and the chicken.
And now, it's recipe time.
*********
The following recipe was inspired by something I discovered while digging through my Simply Thai cookbook that I've had forever. I love this recipe because it uses ingredients that I almost always have on hand. This is a pretty light dish, but has great, spicy flavors with crunchy veggies that add fun texture. It originally called for pork tenderloin (which um, I have not cooked with before and never will. Ever.) and also included bamboo shoots (which I HATE). Instead, I subbed in chicken and water chestnuts (and I haven't looked back!) A red curry paste could be subbed for the chili paste/curry powder combo, as well. I prefer mixing my own because I always have those two items on hand anyway and didn't want to spend money on yet another paste. I prep everything ahead of time, then quickly throw it together as I am cooking to ensure nothing gets burned.
Pad Prik Kai
(Chicken with Red Chili Sauce)
Ingredients:
1 lb chicken breast (thinly sliced, bite-sized pieces)
1 red pepper (thin strips, 2 inches long)
5 tbsp vegetable oil
1 tbsp garlic, chopped
2 tbsp chili paste
2 tsp curry powder
1 cup water
2 tbsp fish sauce
1 tbsp sugar
1 cup sliced water chestnuts
20 basil leaves, chopped
Preparation:
1. Mix the chili sauce and curry powder into a paste.
2. Heat oil on medium high, until it is just about to smoke. Lower heat. Add the garlic and chili/curry paste. Stir-fry quickly for 45 seconds.
3. Immediately add water and raise the heat to High. Stir frequently for 1 minute and add the fish sauce and sugar. Stir fry for 2 minutes, until the sauce is bubbly.
4. Add the sliced chicken, cook for 2 minutes.
5. Add the red peppers and water chestnuts. Stir-fry for 4-5 minutes, until everything is cooked and to the texture you prefer.
6. Add 3/4 of the basil leaves and remove from the stove.
7. Garnish with the remaining basil leaves and serve with white rice.
3 comments:
That looks really good. I've always been timid about cooking with curry because there are many different kinds of curry powders and pastes, no? So, how do I know which one to buy?
My husband makes an amazing coconut shrimp curry sauce (served over rice) and he had the recipe down. However, the last time he made it he was out of the curry paste, and couldn't remember if it was the one with the green lid or the red one. Well, he didn't end up buying the same curry as before. The sauce was good, but it had a very different taste.
I love your food posts! That dish looks so awesome, you're making me hungry. I'm dying for some spicy food. I want to eat at your house.
Olivia - do you buy curry powder from the grocery store or from an ethnic store? Try to get from the ethnic store if possible. Grocery stores are notoriously over-priced. Chili pastes can be found in the Asian section of grocery stores if you don't have an ethnic store nearby - I got my recent chili paste at Target. The ethnic store would have been cheaper, but I didn't have time to run by there.
Post a Comment